The short version
- Use a big, regulated exchange in your country. Licences matter more than flashy bonuses.
- Expect ID checks (KYC). Any “no ID needed” site offering you crypto is a red flag, not a shortcut.
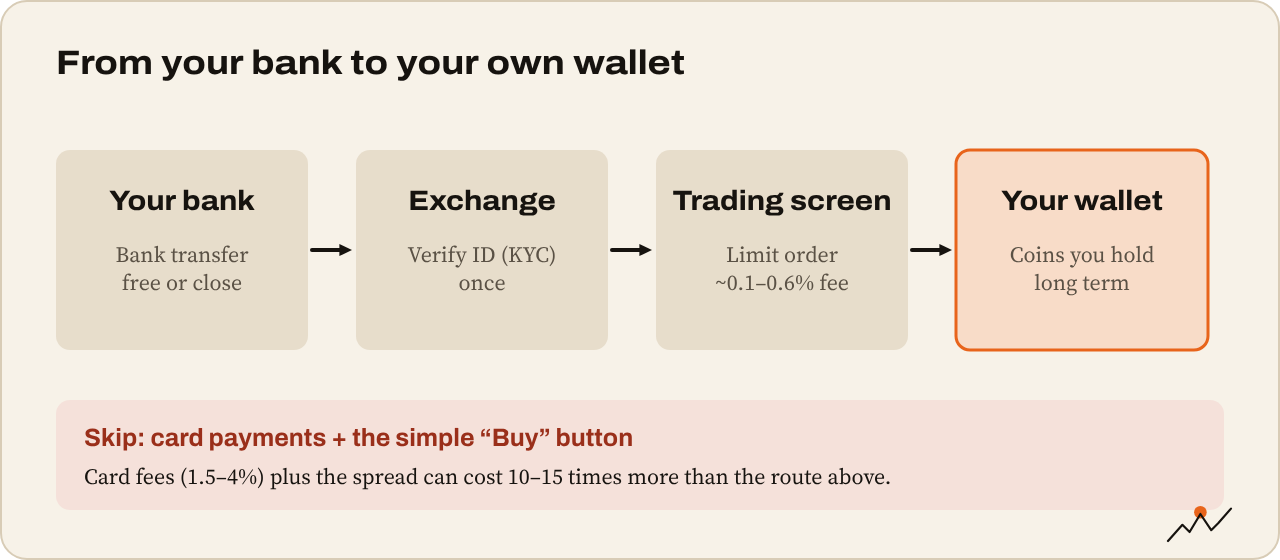
- Fund with a bank transfer and use the exchange’s trading screen, not the “Buy” button with a card. That alone can save you 1–3% per purchase.
- Start small, test a withdrawal, and keep a record of every buy for taxes.
Buying your first crypto is easy. Buying it without overpaying, getting scammed or locking yourself out takes a bit more care. Most beginners lose more to hidden fees and bad sites in their first year than to the market itself.
This guide walks you through it step by step. By the end you’ll know where to buy, what the verification is for, and how to keep fees close to zero.
Step 1: Pick where you’ll buy
You have three main options:
- A centralized exchange (CEX). A company like Coinbase, Kraken, Binance or Bitstamp that holds your money and matches buyers with sellers. This is where almost everyone starts.
- A broker or app. Some payment apps and brokers sell crypto too. Easy, but often pricier, and some won’t let you move the coins out to your own wallet.
- A decentralized exchange (DEX). You trade straight from your own wallet. Great later, but you need crypto first, so it’s not step one.
For your first buy, a centralized exchange is the sensible choice. What matters when choosing one:
- It’s licensed where you live. In the EU, exchanges now need a MiCA license: since July 1, 2026, firms without one can’t serve EU customers. You can look a company up on the ESMA register. In the UK, check the FCA register. In the US, look for state money-transmitter licenses.
- It has a long, clean track record and publishes proof of reserves.
- It supports your bank and the coins you want.
- Fees are clear and listed on a public page.
Watch out. Never pick an exchange from a link someone sends you on Telegram, WhatsApp or a dating app. Fake trading platforms are one of the biggest scams around: the FBI logged $7.2 billion in crypto investment fraud losses in the US in 2025 alone. Type the exchange’s address yourself, or download its app from the official app store.
Step 2: Sign up and verify (KYC)
Every regulated exchange will ask you to prove who you are. This is called KYC, “know your customer,” and it’s required by anti-money-laundering law (AML).
Expect to:
- enter your name, address and date of birth;
- photograph your passport or ID card;
- take a selfie or short video;
- sometimes answer questions about your job and where your money comes from.
It usually takes minutes, sometimes a day or two. It feels intrusive, but it’s also a filter. A site that lets you deposit large sums without any ID is either unregulated or a scam.
While you wait, secure the account. Set a unique password and turn on two-factor authentication with an app, not SMS. Our guide Protecting your accounts shows how in ten minutes.
Step 3: Add money the cheap way
How you pay makes a big difference:
| Method | Typical cost | Speed |
|---|---|---|
| Bank transfer (SEPA, Faster Payments, ACH) | Free or close to free | Minutes to 2 days |
| Debit or credit card | Often 1.5% to 4% | Instant |
| Apple Pay, Google Pay, PayPal | Similar to cards, sometimes more | Instant |
The bank transfer is slower, but it’s by far the cheapest. Some banks block or delay transfers to exchanges the first time; a quick call usually sorts it.
Tip. Credit cards can also count crypto as a “cash advance,” which means fees and interest from day one. Use a bank transfer or a debit card.
Step 4: Place your first order
Most exchanges show you two ways to buy.
The simple “Buy” button. Pick a coin, type an amount, done. Convenient, but the price usually includes a markup (the spread) plus a fee. All in, that can cost 1% to 2% or more.
The trading screen (often called “Advanced” or “Pro”). Here you trade directly against other users at market prices, and fees drop to around 0.1% to 0.6%. It looks scarier, but you only need two order types:
- Market order: buy right now at the best price available. Fine for small amounts of big coins.
- Limit order: buy only at the price you set or better. It may take a while to fill, but it often comes with the lowest fee (the “maker” fee in the maker-taker model).
You’ll see coins listed as pairs, like BTC/USD or ETH/EUR. The first is what you buy, the second is what you pay with. That’s a trading pair.
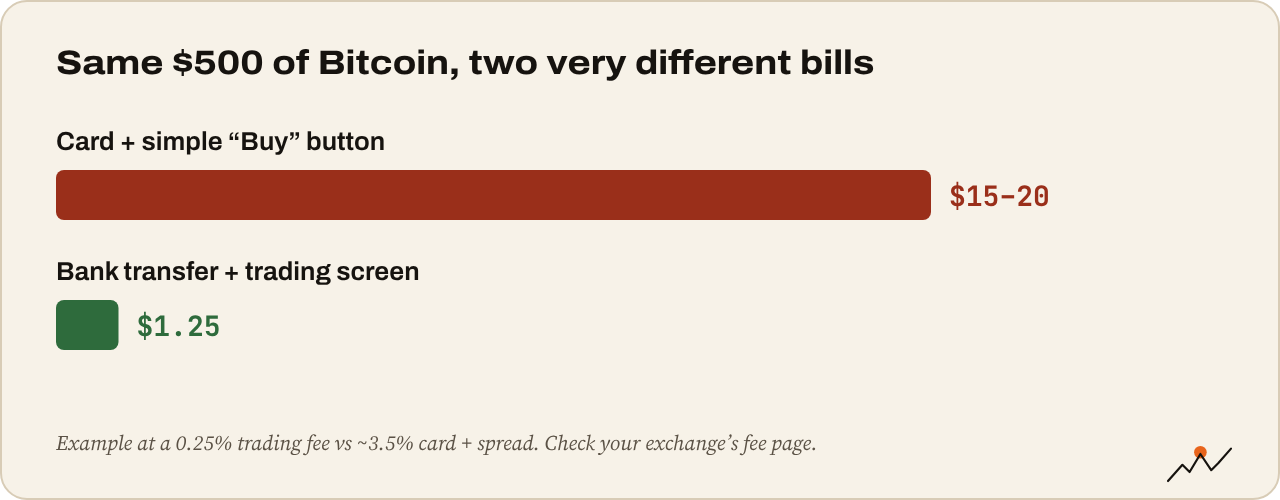
Example: you deposit $500 by bank transfer and buy Bitcoin on the trading screen with a limit order. At a 0.25% fee, you pay $1.25. The same purchase with a card through the simple “Buy” button could easily cost $15 to $20.
Step 5: Decide where the crypto lives
Once bought, your coins sit in the exchange’s wallet. That’s fine for small amounts and for coins you trade. But the exchange holds the keys, and exchanges have failed before: FTX collapsed in November 2022 and customers waited years to get money back.
For anything you plan to hold for a long time, move it to a wallet you control. The next guide, Your first wallet, set up safely, covers how.
Before moving a large amount, always send a small test first. Sending crypto without losing it explains networks and addresses, the step where most beginners make expensive mistakes.
Step 6: Keep records for taxes
In most countries, selling or swapping crypto is taxable. That includes swapping one coin for another, not only cashing out to your bank. Rules differ a lot by country, and tax offices now get data straight from exchanges in many places, including the EU under its DAC8 rules from 2026.
The easy habit: download your transaction history from the exchange every few months and keep it somewhere safe. If you’re unsure about your local rules, a tax adviser who knows crypto is worth the fee.
Your first-buy checklist
- The exchange is licensed in my country and I typed its address myself
- My password is unique and 2FA is on (authenticator app, not SMS)
- I funded with a bank transfer, not a credit card
- I used the trading screen or checked the total fee before buying
- I know where my coins are and whether to move them to my own wallet
- I saved my transaction history
Where to go next
You’ve got crypto. Now it needs a safe home. Part 4: Your first wallet, set up safely.

On the climb since 2017. Trades futures and reads onchain data. Automates the boring parts.
More from VikingXBT →